This post contains affiliate links. I will earn a small commission, at no extra cost to you, if you make a purchase through these links.
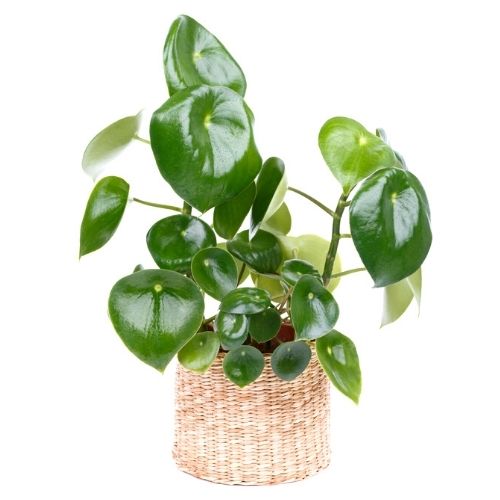
Peperomia Raindrop (scientific name Peperomia Polybotrya, also sometimes known as Coin Leaf Peperomia) is an adorable houseplant known for its raindrop-shaped leaves. Read on for everything you’ll need to know for successful Peperomia Raindrop care and propagation!
Where can I find a Peperomia Raindrop?
You can find yourself a gorgeous Peperomia Raindrop on Etsy! Etsy is one of my favorite places to buy plants because of the virtually endless selection from a huge variety of amazing shops. Grab this Peperomia for your collection here!
How do you take care of a Raindrop Peperomia?
Below is a quick look at Peperomia Raindrop care, but this doesn’t mean you can skip everything else! Be sure to read on for all the crucial tips, plus a propagation guide.
| Light Level: | Bright, indirect |
| Watering: | Allow it to almost completely dry out between waterings |
| Potting Mix: | Well aerated and well draining |
| Repotting: | Every few years, when it outgrows its pot |
| Humidity: | Prefers high humidity |
| Temperature: | 65 – 80° F (18 – 27° C) |
| Fertilizing: | Indoor plant fertilizer diluted by half during the growing season |
| Pruning: | To control legginess and encourage new growth |
How much light does a Peperomia Raindrop need?
Peperomia Raindrop likes bright, indirect light. While it will still grow in a moderate amount of light, bright, indirect light will allow it to flourish to its full potential.
Remember, too much direct sun will burn the precious little raindrop leaves, so keep that light indirect!
Does a Peperomia need sunlight?
Technically, peperomias don’t need sunlight—you can grow them very easily under grow lights! As a matter of fact, this is exactly what I do for my peperomias.
It might be confusing to figure out what direct vs. indirect light means when the light source isn’t the sun. Not to worry though, while full-spectrum lights mimic the sun, they are of course much less powerful than the sun’s direct rays.
You’ll need to experiment with what works for your plants, but all of my grow lights are roughly 10 inches away from my plants. Many grow lights also have an adjustable brightness setting.
Below is one of my absolute favorite grow lights because the clip and two gooseneck lights make it insanely convenient to use almost anywhere! It also has a timer, so I never have to think about turning them on and off:
Peperomia Raindrop Watering
Peperomias store water in their stems and leaves. Therefore, they don’t need to be watered often. Frequent watering could easily lead to overwatering or worst-case scenario, root rot! Water your Peperomia Raindrop when the potting mix almost completely dries out.
To figure out when this is, first and foremost, use your finger to feel the potting mix. In addition, feel the leaves. If they’re very flexible and bendy, that usually means it’s ready to be watered. The leaves will become more rigid once they fill back up with water.
Last, once you’ve had your plant for a little while and get to know the feel of it, you can pick it up to check if the pot feels very light. If so, that means the soil is pretty dry.
Peperomia Raindrop Soil
Peperomia Raindrop (and most other peperomias) are epiphytes, meaning they are found growing on the surface of something else—like the cracks of trees or rocks—and take nutrients from their surroundings instead of out of the ground.
Why does this matter? Since they grow out of loose medium instead of the tightly packed ground soil, they like a well-draining and well-aerated potting mix.
To accomplish this, you can simply use a mix of half general indoor plant potting mix and half perlite. Orchid bark is also an excellent addition to help with aeration and drainage.
Repotting
Most peperomias, including this one, don’t like to or need to be repotted frequently. They have shallow root systems, prefer to be rootbound, and grow slowly.
This all adds up to only needing to be repotted every few years. Eventually, it WILL outgrow its pot, so when it looks like this has happened it’s time to get repotting! Your Raindrop might also have stunted growth if its pot is getting too small.
Use a pot the next size up from its current pot, and make sure it has a drainage hole.
Humidity
Peperomia Raindrop is native to the tropical environments of Columbia and Peru. Therefore, they’ll definitely appreciate humidity, especially if the air is very dry like it is in the winter.
The easiest way to recreate that humid, jungly environment is to use a humidifier! It’s super low maintenance and can help a lot of plants all at once.
I really like the humidifier below because it can last up to 96 hours. Honestly, I forget to refill humidifiers more often than I’d like to admit, so the less refilling I have to do, the better!
Temperature
The ideal temperature range for the Peperomia Raindrop is 65 – 80° Fahrenheit (18 – 27° Celcius). Take this with a grain of salt, though. You don’t need to worry about getting the perfect temperature for your Raindrop plant.
Chances are your normal household temperature is fine. Just don’t keep your plant in areas that tend to get cold in the winter, like right up against a big window.

Fertilizing
Use an indoor plant fertilizer, diluted by half, during the growing season (the spring and summer).
Peperomias don’t need a lot of fertilizer, so don’t overdo it. It’s easy to make this mistake because we just want to be good plant parents and feed our plants, right? Too much can do a lot more harm than good, though.
Pruning and Nodes
You don’t have to prune your Peperomia Raindrop, but doing so will keep it looking in tip-top shape. When pruning, find around where you want to cut, and then find a node and cut ABOVE it.
A node is where leaves and roots grow out of the stem—it’s where new growth comes from. Cutting above means the node will remain ON the main plant—it will NOT be on the piece that gets cut off the plant.
Doing this will cause the plant to push out new growth from that node, so you can imagine how pruning your plant like this will cause more full, bushier growth!
If your plant is growing leggy (long stems with fewer leaves) you can prune off the leggy vines. Legginess happens when your plant doesn’t have enough light.
Note regarding nodes: You cut above the node when you want to prune, and below when you want to propagate. When you’re propagating, you want new growth to grow ON the cutting. Don’t worry, I’ve got a full propagation guide further down in this post.
Add this adorable Peperomia Raindrop to your collection—get it here!
Foliage and Blooms
Peperomia Raindrop has bright-green succulent-like leaves. They are wide, round, and come to a bit of a point at the bottom, giving them a raindrop appearance (it’s a pretty fat raindrop if you ask me though!).
You can also find Peperomia Raindrop Variegata (the variegated version of this plant), although they are a little harder to come by.
Peperomias don’t grow what looks like your typical flower. They produce flower spikes which literally look like greenish-white pointy stems growing out of your plant. The spikes are actually covered in very tiny flowers.
If your Peperomia Raindrop is growing a lot of these spikes, consider cutting them off so they don’t suck important energy away from the beautiful leaves.
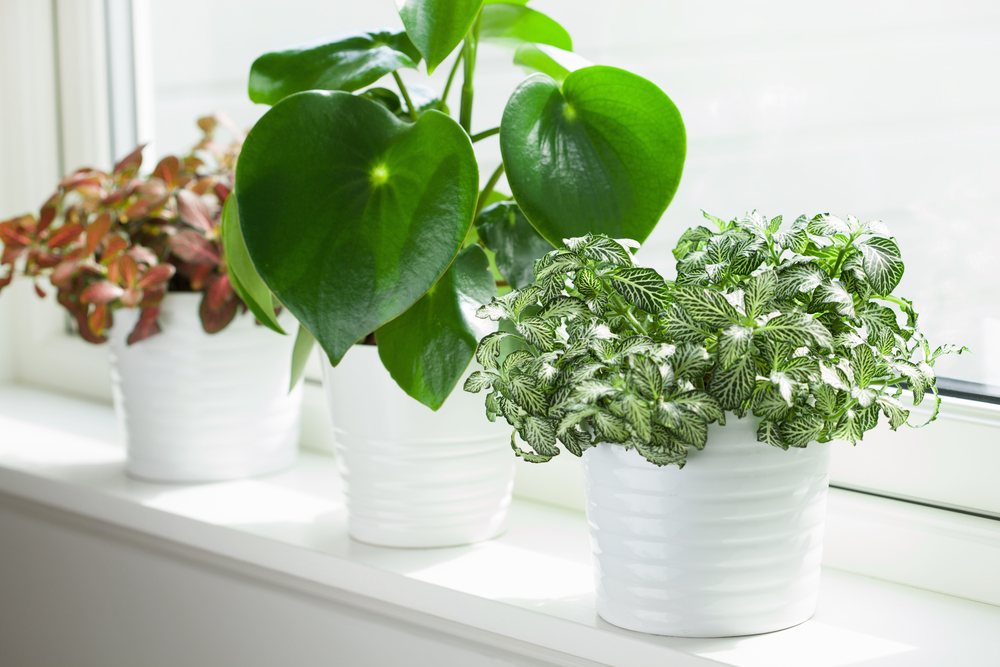
Peperomia Raindrop vs. Pilea
While we’re on the subject of foliage, let’s address the elephant in the room—Pilea Peperomioides. Yes, these plants look extremely similar, but they’re not the same! The most-easily spotted differences are:
- The Raindrop has round foliage that comes to a point (remember, the raindrop shape), while the Pilea has evenly round foliage
- The Raindrop’s leaves typically grow larger in size
- The Pilea has a central woody “trunk” while the Raindrop has more thick, fleshy stems that store water, which is typical for Peperomias
Pilea Peperomioides in the genus Pilea, while Peperomia Raindrop is part of the genus Peperomia. They are not even in the same family (Pilea – Urticaceae, Peperomia – Piperaceae).
Growth Rate and Size
Like most other members of the Peperomia genus, the Raindrop is a relatively slow grower. In optimal conditions, it will reach about a foot (12 inches) in height, making it a totally adorable little Pep!
Peperomia Raindrop Propagation
You can propagate the Peperomia Raindrop with stem cuttings in water or in soil, and with leaf cuttings in soil. I’ll review each method below.
Peperomia Raindrop Propagation with Stem Cuttings – Water
Using stem cuttings for propagating this peperomia is virtually the same as propagating any other plant with stem cuttings. If you’ve propagated plants before, there’s a good chance you already know this method!
- Identify a stem with a few healthy leaves.
- Find a node along the stem around where you want to make your cut.
- Nodes are where leaves and roots grow out of the stem. It’s where new roots will grow on your cutting.
- Cut BELOW the node. This means that the node will be included on the part you cut off the plant. We want it on the cutting because it’s where the new roots will form.
- Put the cutting into a jar of room-temperature water.
- The node should be under the water. If any leaves are too low on the stem and therefore sit under the water, you can remove those leaves.
- Now it’s time to find a spot with bright, indirect light to keep the cutting, and wait! Be sure to fill up the water as needed, and replace it if you see it getting gross.
- Once you see the roots getting around two to three inches long you can plant your cutting into its permanent pot. Water it thoroughly and care for it how you normal would.
Peperomia Raindrop Propagation with Stem Cuttings – Soil
This follows the same process as above, but you’re not rooting your cutting in water.
- Identify a stem with a few healthy leaves.
- Find a node along the stem around where you want to make your cut.
- Nodes are where leaves and roots grow out of the stem. It’s where new roots will grow on your cutting!
- Cut BELOW the node. This means that the node will be included on the part you cut off the plant. We want it on the cutting because it’s where the new roots will form.
- Now, instead of putting your cutting into water, plant it into moist potting mix.
- Similar to water propagation, make sure the node is buried, but don’t bury any leaves.
- Find a spot with bright, indirect light to keep your cutting as the roots develop. Keep the potting mix lightly moist. Providing aditional humidity will also help promote growth.
- You can do this by putting a clear plastic bag or container over the top.
- In one to two months, you can test the development of the roots. Give the cutting a light tug—if there’s resistance, a root system has developed and now you can treat your cutting like a normal plant. If not, that’s OK. Mostly likely, the roots just need more time to develop.
Peperomia Raindrop Propagation with Leaf Cuttings – Soil
Another common but slightly more difficult method of propagating Peperomias is to use LEAF cuttings instead of STEM cuttings.
- Identify a healthy leaf and remove it from the plant, removing the petiole as well.
- The petiole is the smaller stem that’s attached to the leaf. You won’t need the petiole for leaf propagation.
- Cut the leaf in half, right down the middle, horizontally or vertically.
- Stick the leaf halves cut-side-down into moistened potting mix. Now, the process is the same as propagating stems in potting mix.
- Find a spot with bright, indirect light to keep the leaves as the roots develop. Keep the potting mix lightly moist. Providing aditional humidity will also help promote growth.
- You can do this by puttinig a clear plastic bag or container over the top.
- In one to two months, you should start seeing baby Raindrop Peperomias growing from the leaf cuttings! You can now take the babies and gently snap them off from the original leaf cuttings.
- If you’re worried about them being too delicate to snap off, it’s OK to keep them attached.
- Now you can pot your new baby Peperomia into an appropriately sized pot and start caring for it like you normally would with this plant.
While I was preparing to write this article I found this awesome tutorial from Marlene Plantkins on YouTube that shows this leaf cutting propagation process exactly.
Why is my Raindrop plant dying?
There are many possible causes for plant death. But, fortunately, there are only a few extremely common ones. The two most common reasons why your Peperomia Raindrop might be dying include overwatering or underwatering.
Overwatering
Overwatering is so easy to do, especially with plants like Peperomias that like to go longer in between each watering session. You’ll likely see some yellowing of the leaves and leaf drop if this happens.
If you see this, feel the soil to confirm that it IS indeed due to wet soil, and then allow your plant to dry out before watering it again.
If you continually overwater your plant you’ll eventually cause root rot, which is a lot harder to recover from. To prevent this in the first place, make sure to always feel the soil for moisture before watering your plant.
Underwatering
Underwatering has similar symptoms to overwatering, which is why I keep repeating myself in this post about using your finger to feel for soil moisture to help determine the cause!
In addition to yellow leaves and leaf drop, you might see crispy leaves, droopiness of the entire plant, and the leaves will be very flexible rather than rigid.
Underwatering can kill your plant, but it’s usually easier to fix than overwatering.
Pests
While not particularly pest prone, mealybugs and spider mites are two common Peperomia Raindrop pests. Inspect your plants regularly as part of your plant-care routine so you’ll be sure to catch any potential problems early. Make sure to check under leaves, too.
I really like Bonide Systemic Houseplant Insect Control for general pest prevention. I use this whenever I bring a new plant into my home!
Is Peperomia Raindrop Toxic to Cats?
Peperomia Raindrop is non-toxic to cats and dogs, however, even non-toxic plants can still cause discomfort to your furry friend if ingested. My cat had tummy troubles from getting into a non-toxic plant once. I personally keep ALL plants out of my pets’ reach for this reason!
You can buy yourself a beautiful Peperomia Raindrop here!
Care Summary
- Light: Bright, indirect
- Watering: Allow it to almost completely dry out between waterings
- Potting mix: Well aerated and well draining
- Repotting: Every few years, when it outgrows its pot
- Humidity: Prefers high humidity
- Temperature: 65 – 80° F (18 – 27° C)
- Fertilizer: Indoor plant fertilizer diluted by half during the growing season
- Pruning: To control legginess and encourage new growth
More Peperomia Posts
- Peperomia Verticillata (Red Log)
- Cupid Peperomia
- Peperomia Frost
- Watermelon Peperomia
- Peperomia Hope
- Peperomia Prostrata (String of Turtles)
- Peperomia Obtusifolia
susie says
For the cut you make when propagating the plant, you cut below the node, leaving a section of stem on the plant above the last node on the plant. Should you also remove the section of plant that has no node above it? I read other places that that can lead to issues like decay or something
Julie, Houseplant Expert says
Hi Susie – Yes, you can cut off that section, it either won’t do anything or just fall off eventually. Cutting it off to just above the last node on the stem can also trigger new growth on your plant at that node 🙂