This post contains affiliate links. I will earn a small commission, at no extra cost to you, if you make a purchase through these links.
Have you ever seen one of those super Instagram-worthy photos of a plant growing out of a lush, perfectly spherical ball of moss—sometimes even hanging suspended in the air?
That is a Kokedama! And today, I’m going to show you how to make one, step by step, with all the supplies you’ll need AND how to care for your Kokedama going forward.
This is going to be a simple tutorial, accessible for all levels of DIYers. This is actually my first Kokedama, and while it definitely didn’t come out as perfect as the ones described above, I still find it beautiful.
Honestly, I don’t think you should shoot for perfection with something like this. As long as you love how it looks, that’s all that matters. (For me, shooting for perfection is more likely to turn a fun project into a frustrating chore.)
This is such a fun and unexpected way to spice up your plant displays. And it was so easy, I definitely plan to make more!
What is a Kokedama?
Let’s start with the basics. Kokedama is the Japanese art of growing plants out of a ball of soil covered with moss. The word actually translates to “moss ball.”
Kokedama is sometimes called “Poor Man’s Bonsai.” Supposedly, if you couldn’t afford a Bonsai tree, you might opt for a Kokedama instead!
I’ve read from different sources that this art form is in the hundreds of years old, but I can’t confirm the exact timeline. Bottom line—it’s been around for a while!
Kokedama Supplies
As I mentioned earlier, this was my first try and I opted to keep things really simple. I’ll list first what I used, and then I’ll list more materials to consider using if you want to take things up a notch.
Supplies I used for my Kokedama
- Crocodile fern – My personal choice because I just thought it would look awesome!
- Many common houseplants will do well in a Kokedama. If this is your first one, I’d suggest a low-maintenance, non-fussy plant as you learn to care for it in this different style of planter.
- Sphagnum moss
- Must be moist—NOT WET. Use a bowl of water to soak your moss, then wring out the excess water. You might come across some small sticks in your moss. This is totally normal, just remove them.
- Twine/string

Other supplies you’ll want to consider
The more traditional method is to make a mud ball, plant your plant into the mud ball, then wrap that in moss. You’ll see in my tutorial I just used my plant’s rootball as the base instead of making the mud ball.
If you go the more traditional route, you’ll need:
- Ingredients to make a mud ball, such as:
- Akadama clay, Bonsai soil, and potting mix. Or, you could try using a pre-made Kokedama soil. I can’t speak to the specific mixture or ratio since I didn’t use this method, but traditional Kokedama are made with clay. It’s key to holding the ball’s shape.
- Sheet moss
- It’s common to use sheet moss wrapped around the mud ball or sphagnum moss for a neater finish, greener color, and to help hold it all together. (Neither the sheet moss nor the sphagnum moss is actually alive, by the way.)
- Clear fishing line
- A non-biodegradable material is better to use so it doesn’t break down from being soaked in water over time. I had twine on hand so that’s what I used.
- And, if you want to hang your Kokedama, clear fishing line will make it look like it’s floating!
Kokedama Tutorial
Time to get into the fun stuff. My super simple Kokedama only took me four steps.
Step 1
Remove your plant from its pot. Remove any excess, loose soil.
You’re not breaking up or disturbing the roots, just so you have a nice, neat rootball to work with.
I gently crumbled away some soil from the bottom of my crocodile fern that I knew was going to fall off anyway and make a mess.
Step 2
Lay out a pile of moist sphagnum moss to cradle your plant. Then, start working up from there, covering the rootball in moss.
This will take some patience, so take your time! You won’t get it all to stick on in one piece, either, which brings me to the next step…
Step 3
Use your string to secure the moss as you’re building it up. Make it secure, but don’t make it too tight to the point where you’re squeezing the life out of your plant.
I used sooo much string—under the plant, around the plant, even a few pieces over the top, very loose so they didn’t disturb the leaves.
Step 4
Continue to form the ball-like shape with your hands. Don’t be afraid to “sculpt” a little, just make sure you’re being gentle.
I had to do a fair amount of this because it was getting to the point where the fern looked like it was still planted in a pot…just a pot made of moss!
The ball-like shape was lacking, and you DO want this to look like it’s planted in a moss BALL, after all. Add more moss to certain parts, mold it as needed, and secure it all with plenty of string.
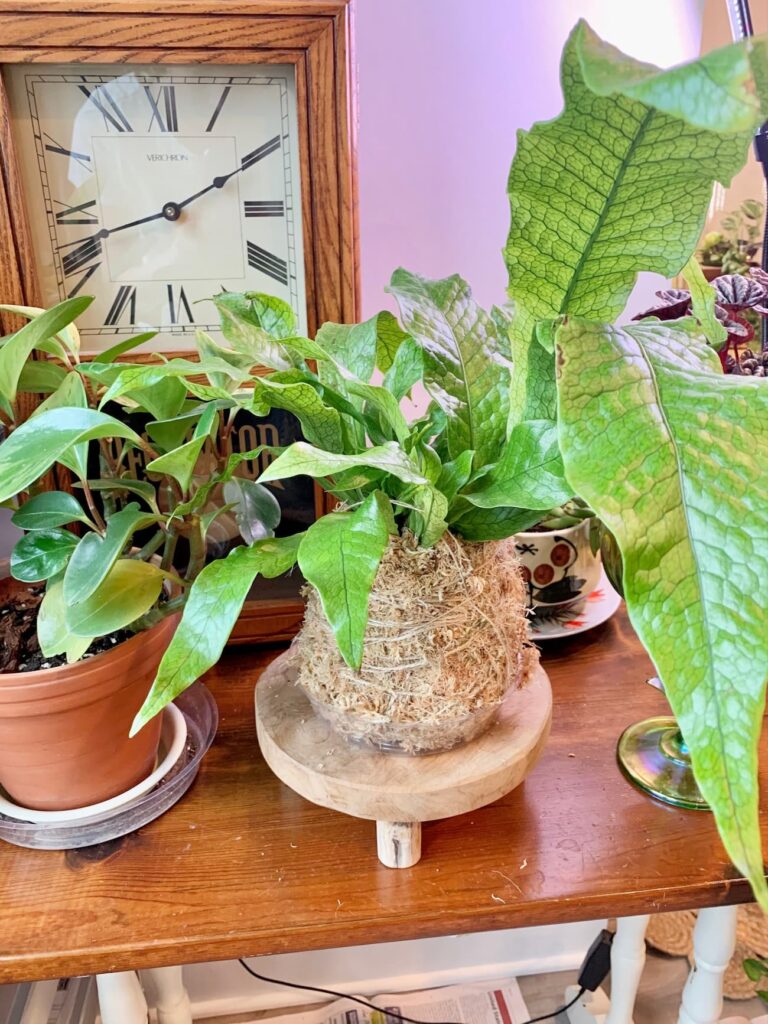
Once the rootball is enclosed in moss and you’re satisfied with the shape, that’s it!
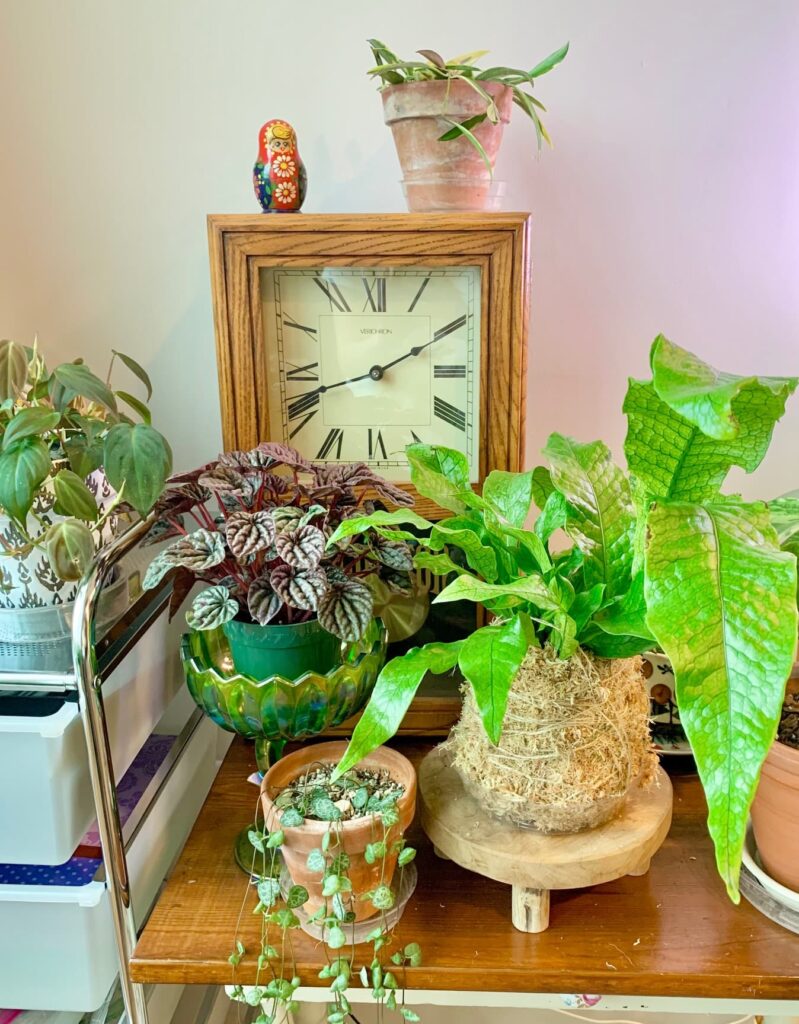
Displaying Your Kokedama
I chose to have mine sitting on a little wooden plant stand. I kept the bottom of mine flat to help keep it stable, and it’s in a clear plastic dish so it doesn’t ruin the plant stand when it’s wet.
A really fun way to display your Kokedama is to hang it. To do this, cut three or four pieces of twine or fishing line (whatever you chose to go with). Make them a little longer than the length you want it to hang.
Find some secure pieces of string that you used to wrap around the Kokedama. Tie one end of each of your strings onto these pieces.
Make sure they are tied to evenly spaced-apart locations around the moss ball so your plant doesn’t hang lopsided.
And, I repeat, be sure to choose secure pieces of string to tie them onto. They need to hold the weight of your plant, plus more after it’s all watered!
Once they’re attached to the Kokedama, tie the opposite ends of the hanging strings together at the top with a strong knot that your plant can hang from.
How Do You Keep a Kokedama Alive?
Light Level
Alright, you’ve built this super cool thing, but how the heck do you keep it alive?
Keep your Kokedama out of direct sun, just as you would with many other houseplants. Too much direct sun can hurt most plants.
You should put your Kokedama in whatever light level the plant you chose prefers. This will probably be bright to medium indirect light.
When to Water
When you feel the sphagnum moss is dry, it’s most likely time to water your Kokedama. This gets a little tricky because it can be hard to tell if the inner rootball inside the moss is still wet.
A good way to confirm if your plant needs watering is to get to know its weight—the same is true with potted plants. After a few watering sessions, you’ll start to recognize how light a dry plant feels vs. how heavy a wet, saturated plant feels.
This is why I suggest going with a non-fussy plant for your first Kokedama since there’s a little bit of a learning curve.
Last, you can look for tell-tale signs of a plant that’s getting a little too dry (e.g., droopy or crispy leaves).
How to Water
Submerge the moss ball in a bowl of room-temperature water. You may lose a few bits of sphagnum moss, but no big deal. It will still hold together if you secured it well with your string or fishing line.
How long it should soak for will depend on the size of the plant. This all becomes a little easier if we just compare it to a normal potted plant—teeny, tiny plants only need a little water while large plants need more.
For a small Kokedama, start by soaking the moss ball for five minutes. For larger Kokedamas, try going up to ten minutes. Observe how your plant reacts and adjust your watering next time if needed.
I recommend being more conservative the first couple of times you water, watering for shorter amounts of time until you learn what your plant likes.
(Note that watering for shorter amounts of time might mean you need to water more frequently.)
After you take your Kokedama out of the water you’ll probably want to set it aside for a few minutes to let it drip dry a bit, but then make sure to put it back in its normal area where it can receive the light it needs.
Leave a Reply