This post contains affiliate links. I will earn a small commission, at no extra cost to you, if you make a purchase through these links.
Have you ever wondered how to propagate alocasias? Of course you have! So what do you do—divide and repot the plant? Pshh, boring! Read on for a SUPER easy alocasia propagation through corms tutorial!
What Is a Corm?
A corm is a modified stem that grows underground and stores food for the plant. People often refer to them as bulbs. There are some slight differences between bulbs and corms, but it’s the same general concept.
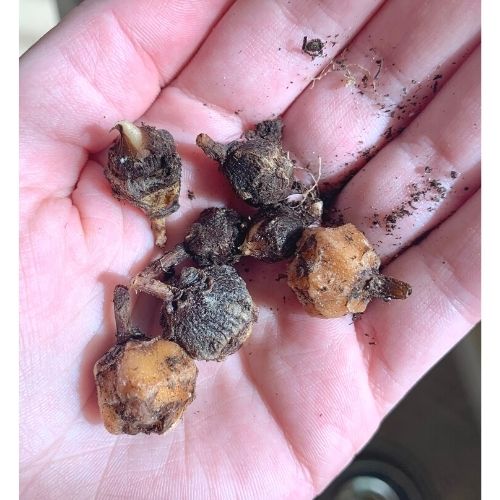
They look kind of like little brown rocks. Usually, you’ll discover these when you’re repotting your alocasia. You might have two or three growing around the root ball, or you might have a lot!
For potted alocasias, sometimes they’ll run into the edge of the pot and then get pushed up so they’re popping out on the surface of the soil. This was the case with the alocasia I’m propagating in the video.
You can snip off these corms and use them to grow more alocasias. Woohoo!
Alocasia Propagation Video Tutorial
Watch my video to see exactly how to propagate alocasias through corms. You can also scroll down a little more if you prefer to read through the steps.
Recommended Supplies for Propagating Alocasias
- Corm Growing Kit – Has everything you need to raise an alocasia from a little baby corm
- Alocasia Corms – Don’t have an alocasia but still want to try this method? No problem! You can find corms from a variety of alocasia species at the link.
How to Propagate Alocasias: Step-by-Step Instructions
Step 1
Find a corm. As I mentioned above, they’re usually under the soil around the roots, but a few might have been pushed up to the surface around the edge of the pot.
Step 2
Snip, snip! The corm is attached to a root. Use clean scissors to snip it off of the root. You don’t need to include any of the root on the corm—just snip the corm off at its base and leave the rest of the root on the plant.
Step 3
The corm is covered in a protective shell. Gently peel away this out layer. You might need to spend a few minutes and use your nails, but it should come off relatively easily.
This will help out the new roots so they won’t have to push through this protective shell.
Step 4
Put the base of the corm into a small container of water. The top part that’s going to sprout the new stem should be above the water. (So, yes, it WILL be a very small amount of water!)

Step 5
Put the corm in an area with bright, indirect light and humidity. I put mine in my IKEA greenhouse cabinet which has both, but you can use something as simple as a clear, plastic bag over the top of the container for humidity.
Make sure to monitor the water level—since it’s such a small amount it’ll probably evaporate quickly!
Step 6
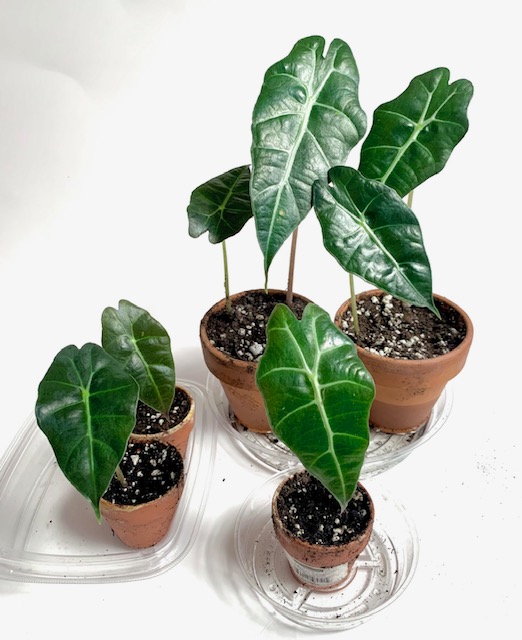
That’s it! Within a few weeks or so you’ll start to see roots emerge from the corm and a stem and leaf sprouting from the top.
Once you have a nice, fully formed leaf, you can move it into a small pot. The leaves will be smaller until the plant matures, but you’ll still see that it’s fully formed. See my photos for reference.
Alocasia Dormancy Period
Starting in the fall and going through the winter, alocasias go dormant. They won’t grow new leaves and may even die back.
Basically, the fall (when I’m writing this and when I filmed the video) is not the best time for propagating alocasias, so just know that you’ll have a lower success rate this time of year.
BUT, since I had three nice, juicy corms popping up out of the soil and begging to be snipped off, I’m just going to see what happens! I’m confident that I’ll be able to find more under the surface when I repot the plant next spring anyway.
Good luck!
Check out these alocasia care guides for more on these awesome plants:
John says
Awesome. Love the step by step guide. What house plant do you recommend inside a room?
Diane says
Thank you for the video. Sometimes word descriptions aren’t enough for me to feel assured I understand all of the fine details.
I also really enjoy propagating. What do you do with all of your newly propagated plants? I find it difficult to keep up with my plant care as they multiply.
Julie, Houseplant Expert says
Hi Diane – I’m glad you found it helpful—written instructions just don’t cut it for certain things! I feel the same way sometimes. Some things I like do to: give the new plants away after I’ve enjoyed them for a little while, put the propagated cuttings back into the same pot for a “bigger” plant, plant multiple cuttings together like in one big pot or a terrarium, and honestly if the cuttings aren’t in the greatest shape and I can’t see them making a nice plant, I’ll throw them away!
Diane says
Thank you for the ideas.
So I rooted a corm with the help of your video. It has three roots about 1 inch long coming out from the sides and a tiny little pointed growth on the top. I “jumped the gun” an got so excited that I potted the corm before I reviewed your instructions to wait for a fully formed leaf. I have a couple of questions. Would you recommend I remove it from the potting mix and put it back on the wet Sphagnum moss under a dome until it grows a leaf? Or could I still have success without waiting for a leaf to grow? And either way, how deep should the corm be planted? Thanks in advance.
Diane says
I followed your directions to the letter, except I added some sphagnum moss for support. It seems to be doing well. There is a leaf stem at about inches long now. I would add a photo if I could. Thank you so much for the guidance.
Diane says
Hi Julie – Thank you for your reply. I followed your instructions, and I now have a 2 inch long leaf! I’m shocked at how quickly it grew in the last week. And honestly, I’m a little bit amazed at the simplicity and success of this first endeavor. I’ve planted it and I wish I could attach a photograph. Thanks to you I now have more confidence and enthusiasm for learning more new plant care skills. Best, Diane